This was my avatar on Etsy for the longest time, because, c'mon...she is a smiling Shetland! Then I added a painted on smile after my first sale, but an Etsy Admin. suggested I switch out to Roger the orange guy, because people in the Etsy office had seen him around, and other people might recognize him. So Roger and Roscoe became my official mascots and retired to my personal collection. But I do miss this adorable face now and then!
Thursday, October 16, 2008

Tuesday, September 30, 2008
How-To: Make A Painless Needlefelted Christmas Decoration
 If you have ever pulled out your wool and needles around people who haven't heard of needlefelting, you probably get the same question I get, "Can you teach me?" My answer is usually "No," not only because I am a lousy teacher, but also knowing how much damage a sharp, downward-barbed needle can do to one's fingers. So I hesitate to let the interested kids (and some adults!) I know start stabbing. How do you share the joy of your craft, without sharing the pain?
I wanted to make a christmas ornament with my mom, who doesn't have any needlefelting experience yet, and thought a good template, or stencil, would be a cookie cutter! I remembered all the fun cookie cutters we used growing up, most of them in Christmas shapes. So we found the standard Gingerbread Man cookie cutter and started stabbing away! The high walls were perfect to run the needle straight up and down without having to put your digits in harm's way.
So if you want to get someone with tender, innocent fingers started in this fun and addictive craft, try some things you have in your house first, and in no time they will pick up the basics of needlefelting.

1) What you'll need: felting needle (I used a size 40), foam,
cookie cutter with no bar across the top, various colors
of wool roving depending on what you are making.

2) Put your cookie cutter on your foam work
surface, and start laying wool over the top, being
sure to lay wool over the edges, and in different
directions.

3) Push the wool down, and keep adding
more wool until the cookie cutter
is loosely filled with the roving.
more wool until the cookie cutter
is loosely filled with the roving.

4) Start pushing the needle straight up

and down along the perimeter of the
cookie cutter, and continue all the way around, leaving the middle for later.

5) Before you go any further, it's good to
lift up the cookie cutter, and pull the wool
off the foam, so it doesn't get too stuck in
the foam. If you've felted all the way
around the inside edge, it should
hold it's shape well.

6) Now, push the wool back into the
cookie cutter and felt all the wool
in the middle down until it is uniformly felted.

7) Now you can remove the cookie cutter and you should have a semi-firm felted shape.

You can start adding details any way you like, I chose to use
the standard Gingerbread Man embellishments.
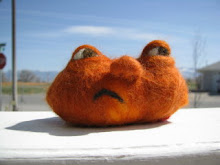
 You could embellish with beads, sequins, embroidery, or anything you feel like! To make these into hanging tree ornaments, simply sew a loop of thread near the top and tie a knot. Metallic thread looks good for this. The snowman at the top of the page was made using the same cookie cutter, but my mom added some length to the legs after step 6, then gently wet felted the whole body until it was what she wanted. Then she and I added the carrot shaped nose, and the black eyes and mouth. It resembles a primitive snowman doll she found a while back, and I can't wait to make more!
Also, if you are helping teach someone who is either really impatient, or just really young, you could skip most of the time-consuming steps, and just have them trace the body from a piece of pre-made felt, then just needlefelt the details. They would make good easy hanging ornaments, or even special tags to adorn presents. Happy Felting!

You can start adding details any way you like, I chose to use
the standard Gingerbread Man embellishments.
 You could embellish with beads, sequins, embroidery, or anything you feel like! To make these into hanging tree ornaments, simply sew a loop of thread near the top and tie a knot. Metallic thread looks good for this. The snowman at the top of the page was made using the same cookie cutter, but my mom added some length to the legs after step 6, then gently wet felted the whole body until it was what she wanted. Then she and I added the carrot shaped nose, and the black eyes and mouth. It resembles a primitive snowman doll she found a while back, and I can't wait to make more!
Also, if you are helping teach someone who is either really impatient, or just really young, you could skip most of the time-consuming steps, and just have them trace the body from a piece of pre-made felt, then just needlefelt the details. They would make good easy hanging ornaments, or even special tags to adorn presents. Happy Felting!
Friday, September 19, 2008
Fall Watercolor Background
So I painted a background for this piece in watercolor...now I have even less of an idea how to mount it. I did the painting background so I could frame it, but the wool just doesn't look as good behind glass. Can't say it looks right or not until I cut the background to fit a frame though. Maybe I'll get all sorts of tricky and mount the watercolor to a mat, and have the wool part under! Yeah! I think that might be the ticket. That's why it didn't look right, the farthest away part (the wool) is on top, and needs to be under it all! Learn new things all the time...

Thursday, September 18, 2008
Autumn Down the Old Road
Looks like I'll need to order some ACEO double thick mats from some fellow Etsians. This was supposed to be rectangular, but after needle felting all the trees and road, it pulled in the corners! A lot! It's not nearly as oval as this picture makes it look, it's really quite irregular shaped. I don't know how to hang it on the wall without a frame, so hopefully my Felting Forum Buddies will help me on that. This was so fun though, I think I'll try a Montana version of Fall Foliage with some evergreen trees too. We have much more yellow here than red. Still brilliant and too short lived.

Tuesday, September 9, 2008
Prima Ballerina

Well, Squeakers changed her mind about being a ghost for Halloween, so I made her a tutu today. I wonder what she'll be tomorrow!
Monday, September 8, 2008
Trick or Squeak!


My mom suggested I make a ghost costume for little Squeakers the Mouse...so I did! Turned out pretty cute, but I still have to add black shadows around the eye holes for better definition, and break up the white a little. I think I'd like to make a whole slew of accessories for Squeakers, for different seasons and occasions.
I should mention that when I was about 9-12 years old, living in a Tennessee country home, all the "stray" mice and other assorted rodents, like a flying squirrel, that I adopted as my pets, I named Squeakers. Or versions of the word "squeak". My kitten was named Squeaky for her sad high-pitched meow, so I guess I tried to honor her by naming all the rodents after her. So after a rigorous search for the perfect name for this little mouse, I remembered the little girl long ago who knew what her name would be right off!
Sunday, September 7, 2008
Felted Grand-Gnomes and Baby


Well, I've pretty much finished up these guys, with the exception of some last minute fuzzy trimmin', and maybe some coloring on the cheeks or lips. I think I'll "tack" the baby into her arms so it stays put and really looks like she's cuddling her.
The bag was just an extra thanks to the lady who commissioned the gnomes, and I kind of got carried away with the willow tree. It was an experiment and now I know what I'd do differently next time. I really like the whole "painting with wool" effect. With a little forethought you could save a lot of time!! Shane is a natural artist with lots of painting experience, so maybe he'll guide me next time on how to layer the different perspectives. But it was still fun to play around with no pressure on how it turned out.
I hope she likes the gnomes, I had every bit of artistic license to make them, which can be almost harder than following someones requirements.
Subscribe to:
Posts (Atom)