
 If you have ever pulled out your wool and needles around people who haven't heard of needlefelting, you probably get the same question I get, "Can you teach me?" My answer is usually "No," not only because I am a lousy teacher, but also knowing how much damage a sharp, downward-barbed needle can do to one's fingers. So I hesitate to let the interested kids (and some adults!) I know start stabbing. How do you share the joy of your craft, without sharing the pain?
I wanted to make a christmas ornament with my mom, who doesn't have any needlefelting experience yet, and thought a good template, or stencil, would be a cookie cutter! I remembered all the fun cookie cutters we used growing up, most of them in Christmas shapes. So we found the standard Gingerbread Man cookie cutter and started stabbing away! The high walls were perfect to run the needle straight up and down without having to put your digits in harm's way.
So if you want to get someone with tender, innocent fingers started in this fun and addictive craft, try some things you have in your house first, and in no time they will pick up the basics of needlefelting.

1) What you'll need: felting needle (I used a size 40), foam,
cookie cutter with no bar across the top, various colors
of wool roving depending on what you are making.

2) Put your cookie cutter on your foam work
surface, and start laying wool over the top, being
sure to lay wool over the edges, and in different
directions.

3) Push the wool down, and keep adding
more wool until the cookie cutter
is loosely filled with the roving.
more wool until the cookie cutter
is loosely filled with the roving.

4) Start pushing the needle straight up

and down along the perimeter of the
cookie cutter, and continue all the way around, leaving the middle for later.

5) Before you go any further, it's good to
lift up the cookie cutter, and pull the wool
off the foam, so it doesn't get too stuck in
the foam. If you've felted all the way
around the inside edge, it should
hold it's shape well.

6) Now, push the wool back into the
cookie cutter and felt all the wool
in the middle down until it is uniformly felted.

7) Now you can remove the cookie cutter and you should have a semi-firm felted shape.

You can start adding details any way you like, I chose to use
the standard Gingerbread Man embellishments.
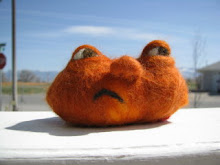
 You could embellish with beads, sequins, embroidery, or anything you feel like! To make these into hanging tree ornaments, simply sew a loop of thread near the top and tie a knot. Metallic thread looks good for this. The snowman at the top of the page was made using the same cookie cutter, but my mom added some length to the legs after step 6, then gently wet felted the whole body until it was what she wanted. Then she and I added the carrot shaped nose, and the black eyes and mouth. It resembles a primitive snowman doll she found a while back, and I can't wait to make more!
Also, if you are helping teach someone who is either really impatient, or just really young, you could skip most of the time-consuming steps, and just have them trace the body from a piece of pre-made felt, then just needlefelt the details. They would make good easy hanging ornaments, or even special tags to adorn presents. Happy Felting!

You can start adding details any way you like, I chose to use
the standard Gingerbread Man embellishments.
 You could embellish with beads, sequins, embroidery, or anything you feel like! To make these into hanging tree ornaments, simply sew a loop of thread near the top and tie a knot. Metallic thread looks good for this. The snowman at the top of the page was made using the same cookie cutter, but my mom added some length to the legs after step 6, then gently wet felted the whole body until it was what she wanted. Then she and I added the carrot shaped nose, and the black eyes and mouth. It resembles a primitive snowman doll she found a while back, and I can't wait to make more!
Also, if you are helping teach someone who is either really impatient, or just really young, you could skip most of the time-consuming steps, and just have them trace the body from a piece of pre-made felt, then just needlefelt the details. They would make good easy hanging ornaments, or even special tags to adorn presents. Happy Felting!
3 comments:
Morgan this is a great idea and thanks for posting this in stages, great for kids to learn like this.
I love to teach anyone who wants to learn (adults) sometimes they only stab themselves once and then there very careful. lol
cheers karen
Morgan i forgot to tell you that i love your banner, can i please use your imagination, mines not working. lol
gorgeous
This is so great! What a fun way to introduce friends to needlefelt and leave them with a cute Christmas ornament, too. I love this tutorial. :)
Gina - RoseThistleArtworks
Post a Comment